The honest guide
Here’s the uncomfortable truth about most advice on how to stay safe on public Wi-Fi: it’s a decade out of date. The classic scare story — a hacker in the corner of the café silently reading your bank password out of the air — describes a threat model from around 2014, before HTTPS became the default across essentially the entire web.
That doesn’t mean public Wi-Fi is risk-free. It means the risks have moved. What leaks now isn’t the content of your traffic; it’s the metadata around it. And the attack that still works isn’t passive eavesdropping — it’s tricking you into joining the wrong network in the first place.
This guide covers what’s actually exposed on a café or airport network in 2026, the seven settings that meaningfully change your exposure, and where a VPN genuinely helps versus where it’s being oversold to you.
Last updated: August 30, 2026 · Time to complete: about 15 minutes of setup, once
The practical answer
How to stay safe on public Wi-Fi: the 7 controls that matter
Public Wi-Fi is usually safer than old scare stories suggest because HTTPS protects page contents and credentials in transit. The controls that matter now are verifying the network, stopping automatic joins, treating captive portals as phishing surfaces, keeping devices locked down, encrypting DNS, and using a VPN when you want to hide destination metadata from the network operator.
Use the VPN Guides hub for the full knowledge base, or browse the public Wi-Fi security guides for closely related setup help.
Before you begin
What you’ll need
- Your phone and laptop (the setup is per-device)
- 15 minutes on a network you trust — do this at home, not in the airport
- Optional but recommended: a VPN with an auto-connect rule for untrusted networks. Proton VPN’s free plan works for this and has no data cap, so you can complete every step in this guide without paying anything.
What is actually exposed
First, the honest threat model
Skip this section and the rest of the guide won’t make sense. Most people are defending against the wrong thing.
What HTTPS already protects
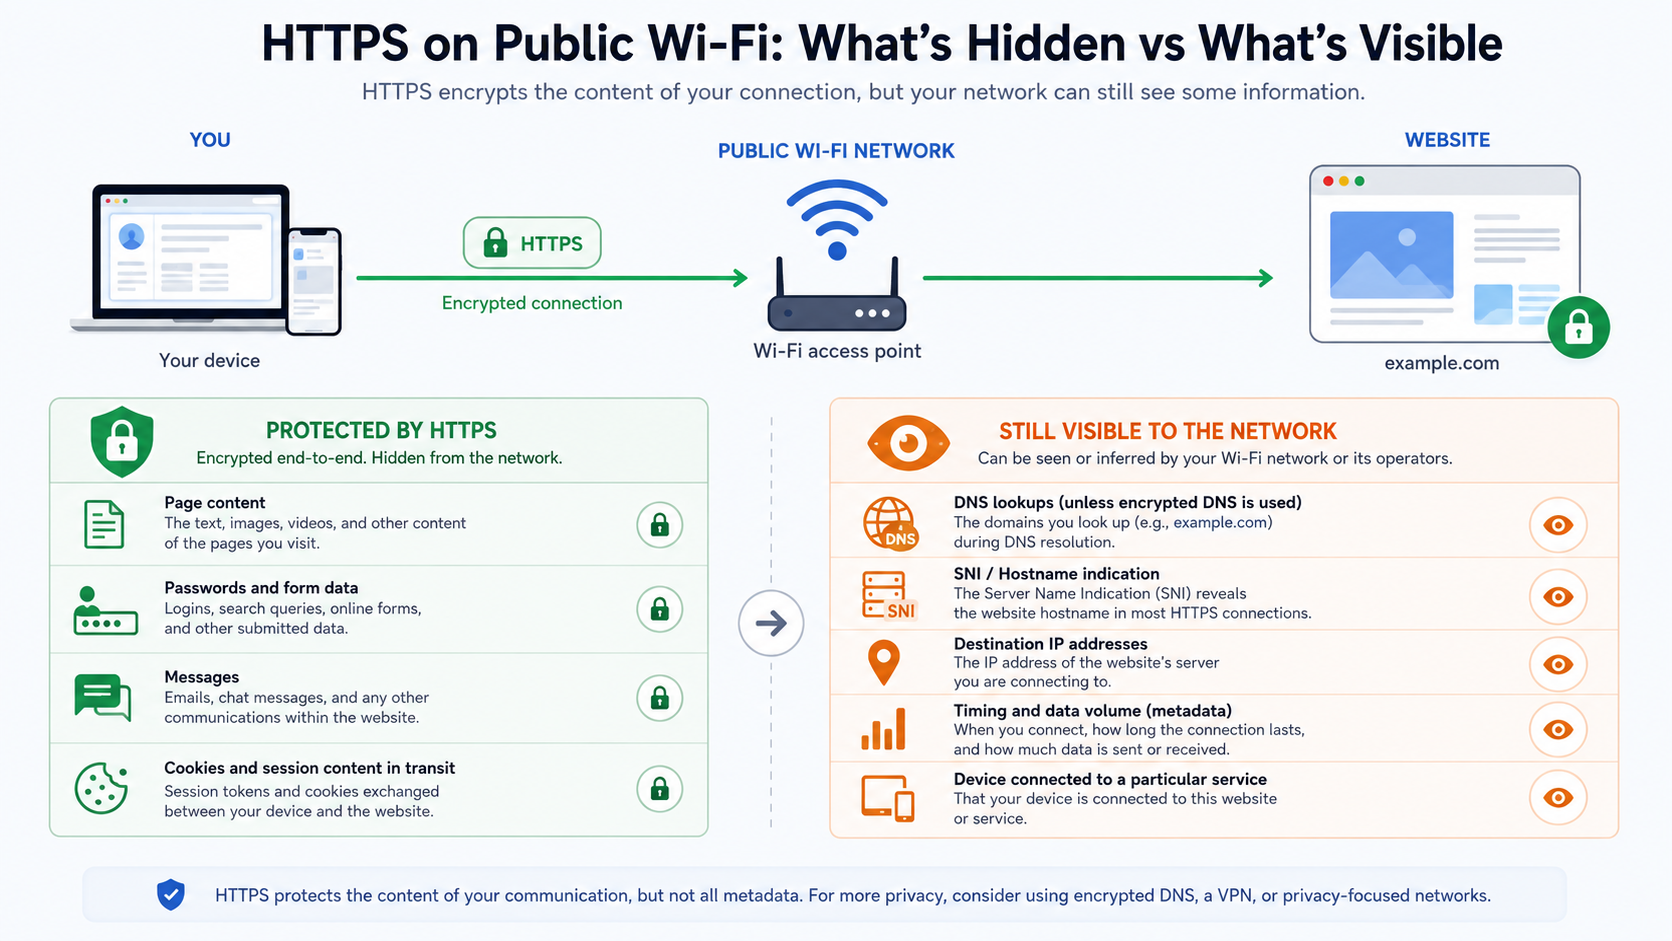
Effectively the entire web now runs over HTTPS — adoption climbed from roughly a third of page loads in 2015 to the mid-90s by 2020, and Chrome is switching to secure connections by default in 2026. When you’re on HTTPS, the contents of your session are encrypted between your browser and the server. Someone sniffing the air in the café sees ciphertext.
That’s why the FTC’s own public Wi-Fi guidance is far more measured than it used to be. Passive interception of your passwords and messages is largely a solved problem, and it was solved by the browser, not by you.
What HTTPS doesn’t hide
Encryption protects the content. It does not protect the context:
- DNS queries. Unless you’ve enabled encrypted DNS, the network sees every domain your device looks up — including the ones from background apps you forgot were running.
- SNI (Server Name Indication). During the TLS handshake, your browser announces which hostname it wants. Unless Encrypted Client Hello is in play on both ends, that’s readable.
- Traffic patterns. Timing, volume and destination IPs reveal a surprising amount, even fully encrypted.
So the network operator — whether that’s the hotel chain, the airport’s ad-tech partner, or someone impersonating both — can build a solid picture of where you go, even if they can’t read what you did there.
The threat that’s still genuinely dangerous
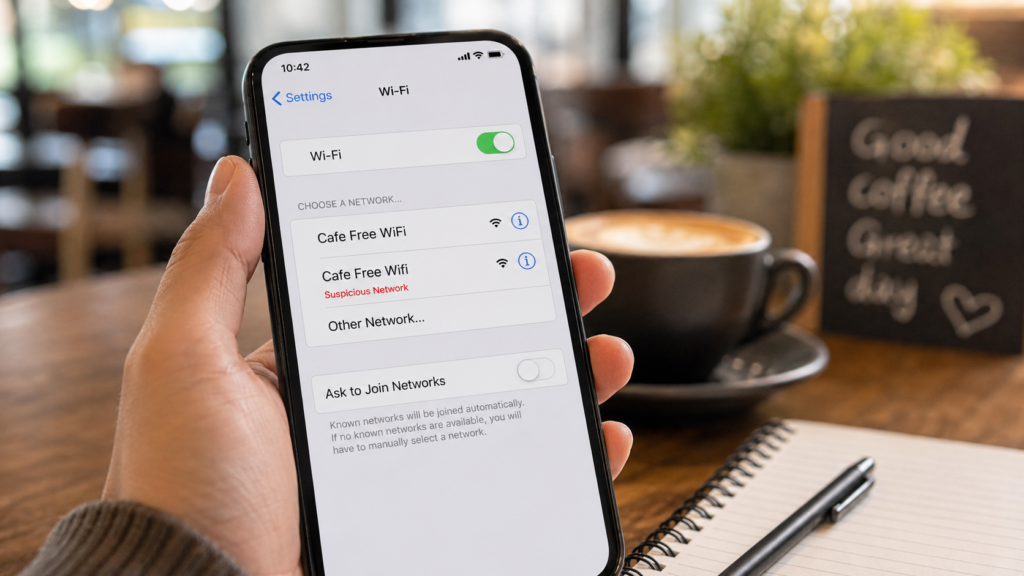
Evil twin networks. An attacker sets up an access point broadcasting a plausible name — Starbucks_WiFi, Airport_Free_WiFi, Marriott_Guest — often with a stronger signal than the real one. Your device joins it. Then they present a fake captive portal: a login page that looks exactly like the real one, asking for an email and password, a room number, or "verify with your Google account."
This is the attack to actually worry about, for one reason: it doesn’t break encryption, it bypasses it. You hand over the credentials voluntarily. A VPN doesn’t stop it. Neither does HTTPS. Only your own judgement does — which is why Steps 1, 2 and 6 below matter more than anything else in this guide.
Step 01
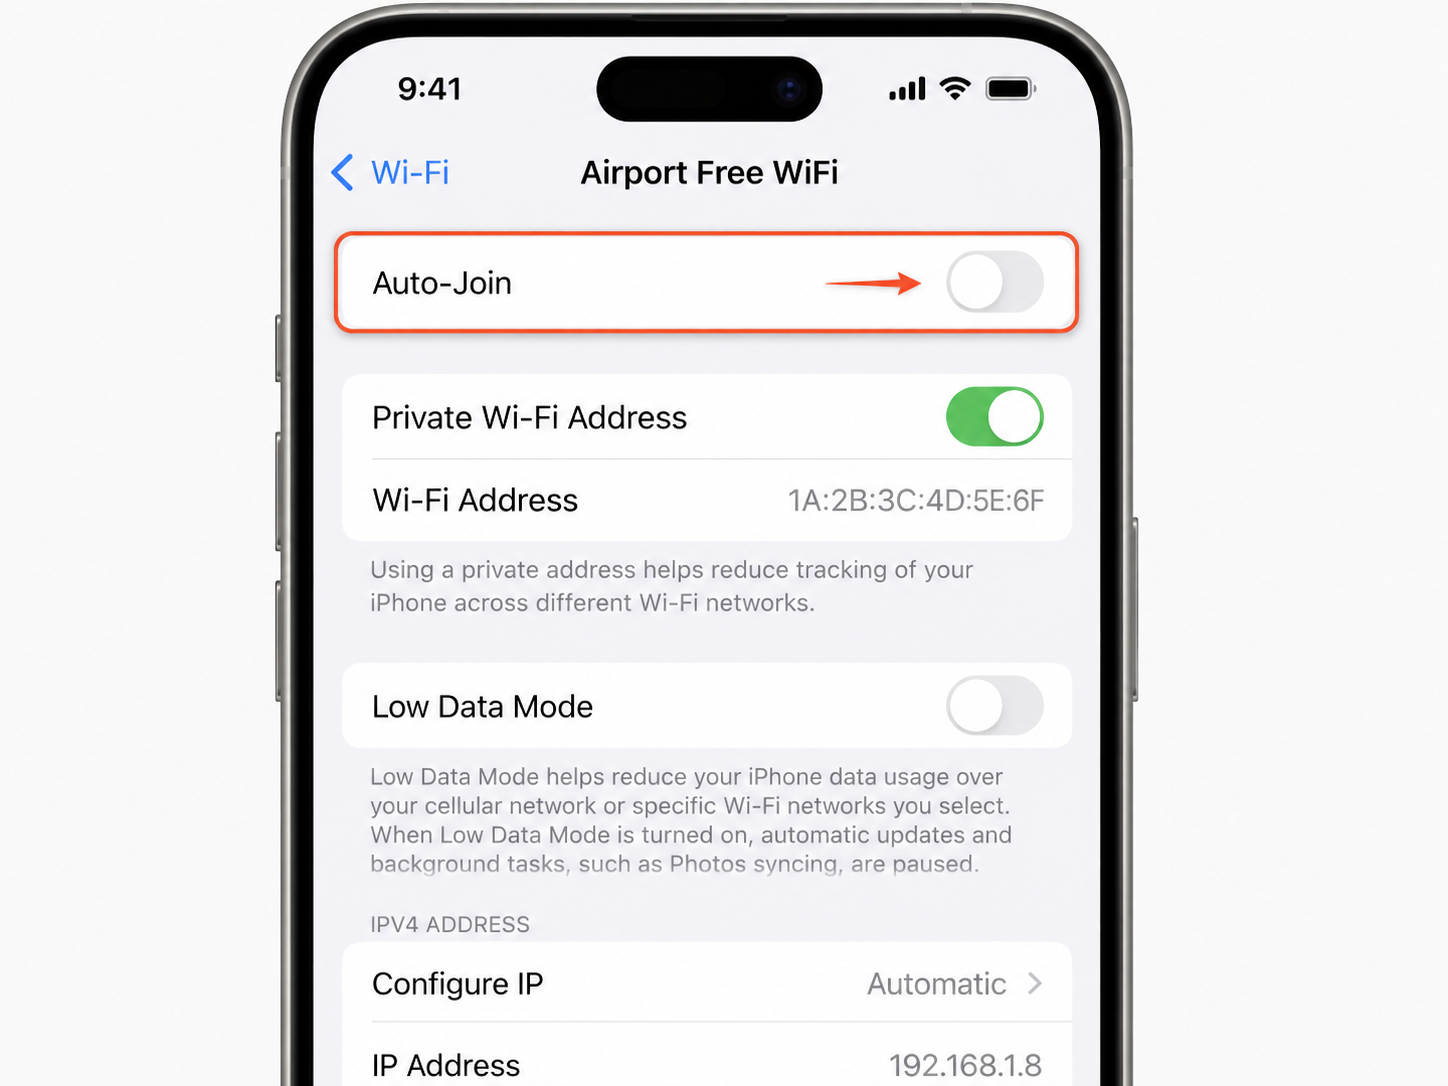
Step 1: Turn off auto-join for open networks
Your device keeps a list of networks it’s joined before and silently reconnects when it sees a matching name. An attacker only has to broadcast a common SSID — attwifi, xfinitywifi, the name of a hotel chain you stayed at once — and your phone connects on its own, before you’ve looked at the screen.
iPhone: Settings → Wi-Fi → Auto-Join Hotspot → Never. Then tap the ⓘ next to each saved network and disable Auto-Join for public ones.
Android: Settings → Network & internet → Internet → Network preferences → turn off "Connect to open networks."
Windows: Settings → Network & Internet → Wi-Fi → Manage known networks → untick "Connect automatically" for public entries.
macOS: System Settings → Wi-Fi → Advanced → untick "Auto-join" per network.
Then prune the list. Every saved public network is a name an attacker can impersonate. If you’re not going back to that airport this year, forget it.
Step 02
Step 2: Verify the network name before you connect
Thirty seconds of friction that defeats the most dangerous attack on this list.
- Ask staff for the exact SSID. Not "the free one" — the exact string. Attackers rely on you guessing.
- Be suspicious of duplicates. Two networks with near-identical names, one with a noticeably stronger signal, is the classic evil twin signature.
- Prefer the network with a password, even if the password is written on a chalkboard and everyone in the room knows it. A shared WPA2 key still means each client gets a separate session key — meaningfully better than a fully open network.
- Look for a lock icon on an "open" network. That’s Wi-Fi Enhanced Open (OWE), which encrypts your session with no password at all. Still uncommon, but rolling out — and it’s strictly better than legacy open Wi-Fi.
Step 03
Step 3: Connect the VPN before you open anything else
Order of operations matters. Join the network, clear the captive portal (Step 6), then connect the VPN before launching a browser, mail client, or messaging app.
Once the tunnel is up, your DNS queries, SNI and traffic destinations all go through the encrypted tunnel. The network operator sees an encrypted connection to a VPN server and nothing else. That closes the metadata gap from the threat model above — which is the single most legitimate reason to run a VPN on public Wi-Fi.
Two settings to enable while you’re at home:
- Auto-connect on untrusted networks. All three providers below support this. It removes the failure mode where you forget.
- Kill switch. Then actually test it: connect, turn Wi-Fi off and on, and confirm traffic stops during the gap rather than briefly leaking.
Step 04
Step 4: Lock down the device itself
The network can see your device, and other clients on the same network sometimes can too. Reduce what’s visible.
- Turn on the firewall. macOS: System Settings → Network → Firewall. Windows: Windows Security → Firewall & network protection → make sure the Public profile is active.
- Set the network as Public, not Private. Windows asks this on first connection; getting it wrong enables discovery and sharing.
- Disable file and printer sharing. macOS: System Settings → General → Sharing → turn everything off. Windows: Advanced sharing settings → turn off network discovery and file sharing for Public networks.
- Set AirDrop to Contacts Only (or Receiving Off). "Everyone" on a busy airport network is an invitation.
- Turn off Bluetooth discoverability if you’re not using it.
- Install pending OS updates before you travel. Patching over hotel Wi-Fi is slow and, on a compromised network, unwise.
Step 05
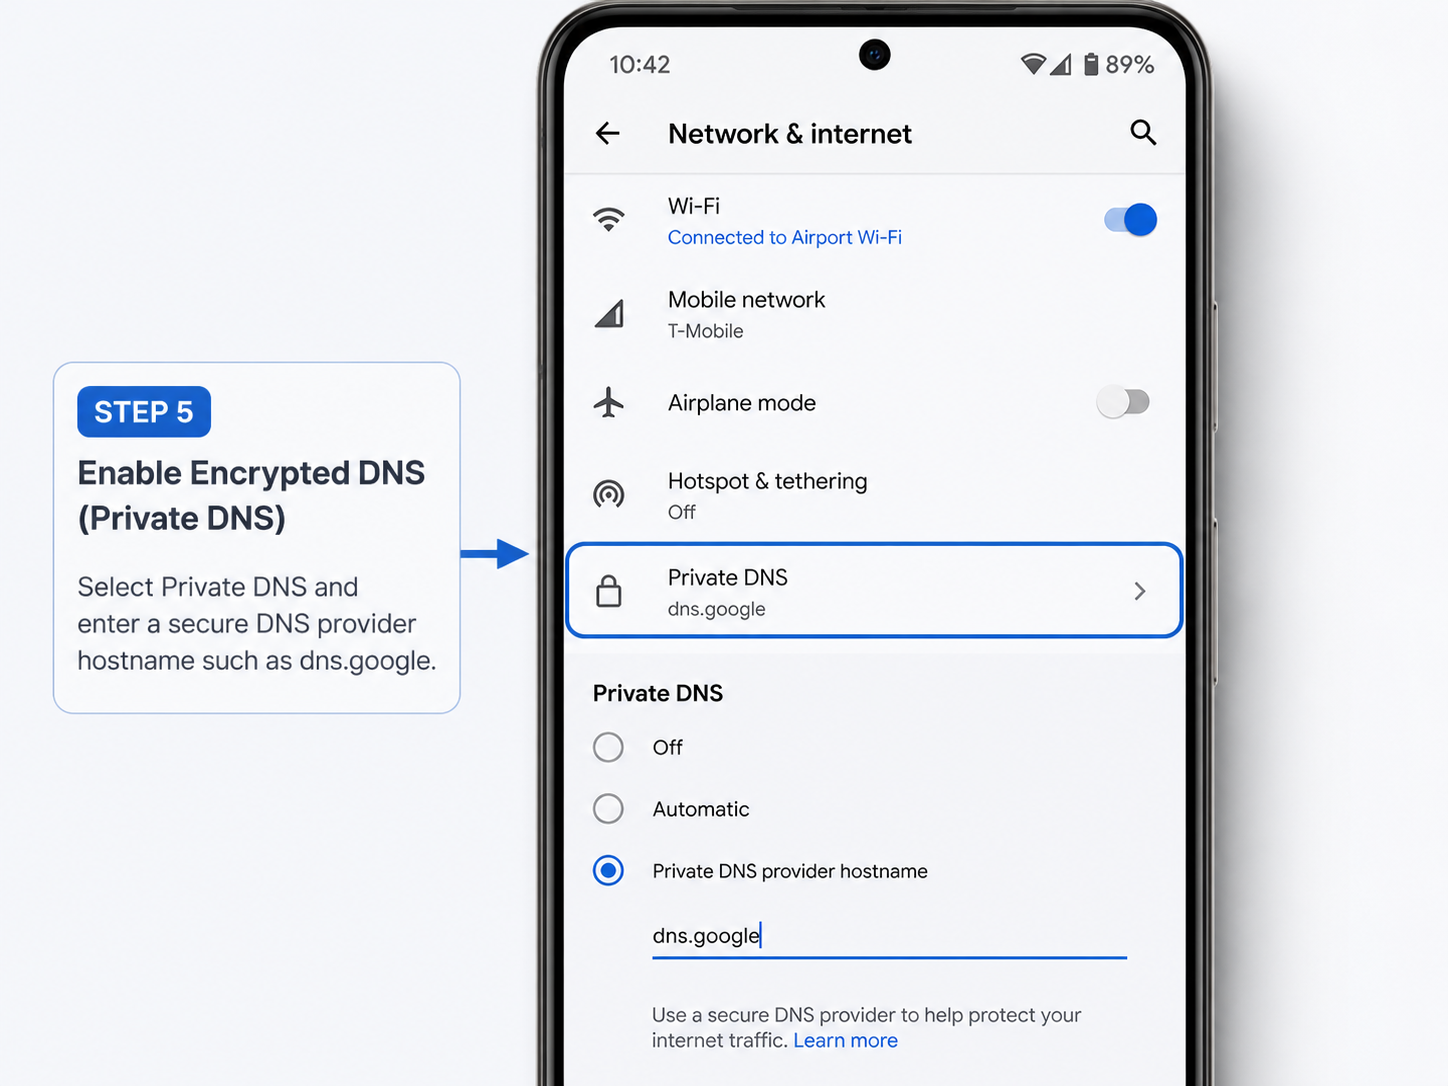
Step 5: Turn on encrypted DNS
If you don’t run a VPN full-time, this is the highest-value change you can make in two minutes. Encrypted DNS (DoH or DoT) stops the network from reading — or redirecting — your domain lookups.
iOS/macOS: Install a DNS profile from a provider like Cloudflare or Quad9, or use your VPN app’s built-in DNS. Android: Settings → Network & internet → Private DNS → Automatic or a specified hostname. Windows 11: Settings → Network & Internet → Wi-Fi → Hardware properties → DNS server assignment → Edit → enable DNS over HTTPS. Browser-level: Chrome, Firefox and Edge all have a "Secure DNS" toggle in privacy settings — covers the browser only, not the rest of the device.
If you’re running a VPN, it should handle DNS inside the tunnel. Verify with a DNS leak test while connected — you should see your VPN provider’s resolver, not the café’s.
Step 06
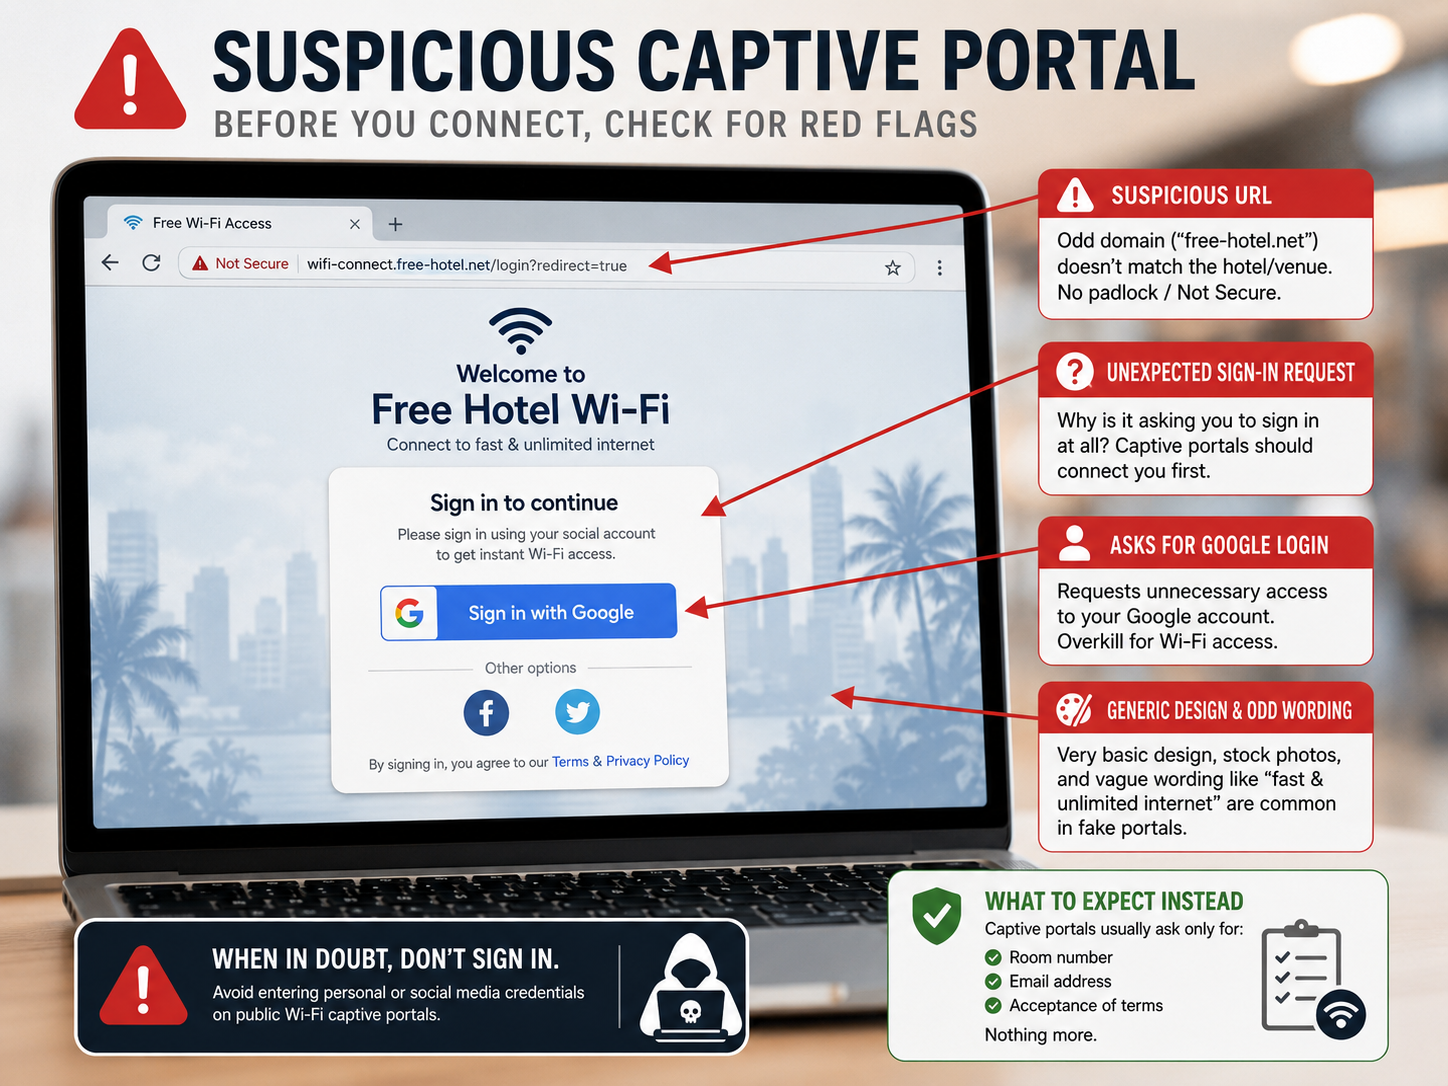
Step 6: Handle the captive portal carefully
The login page is where public Wi-Fi attacks actually land. Rules:
- Never enter a real password. Legitimate portals ask for an email, a room number, or a click on "I agree." They do not need your Google, Apple or Facebook credentials. A portal offering "sign in with Google" is a red flag, not a convenience.
- Use a throwaway email address if one is required. There’s no reason for the airport to have your primary address.
- Never install anything the portal offers. No certificates, no profiles, no "required" apps. A certificate install is a request to decrypt your traffic.
- Check the URL if you can see it. Portals redirect oddly by design, which is exactly why attackers like them — but an obvious mismatch is worth stopping for.
- Connect the VPN immediately after the portal clears. Not five minutes later.
If your kill switch blocks the portal from loading, most apps have a pause or a "allow LAN / captive portal" option. Learn where it lives before you need it in a queue.
Step 07
Step 7: Keep banking off public Wi-Fi entirely
Not because HTTPS will fail — it won’t. Two more practical reasons:
- Banks flag unusual IPs. Logging in from a café VPN exit node in another country is a reliable way to trigger a security lock while you’re travelling.
- Shoulder surfing is real and completely unaffected by any of the above.
Use cellular data for financial apps. If you must use Wi-Fi, route banking outside the tunnel with split tunnelling (Bypasser on Surfshark, split tunnelling on NordVPN) so everything else stays protected.
Airport, hotel and café checklist
Public Wi-Fi threat model by location
The safest response depends on the network, portal and task—not on a blanket “public Wi-Fi is dangerous” claim.
| Location | Likely failure | Verify first | Safer fallback |
|---|---|---|---|
| Airport | Lookalike SSID or crowded captive portal | Exact network name on airport signage or with staff; portal should not request an account password | Cellular/eSIM for identity, banking and urgent account recovery |
| Hotel | Room-number portal, weak shared password, stale saved network | SSID and portal requirements with reception; forget the network at checkout | Travel router for a longer stay, or a mobile hotspot for sensitive work |
| Café / coworking | Automatic join, local sharing, shoulder surfing | SSID with staff; Public network profile; file sharing and AirDrop off | Phone tethering when the venue cannot confirm its network |
Two-minute preflight
- Verify the exact SSID. Never choose by strongest signal or a familiar-looking name alone.
- Inspect the captive portal. Do not install a certificate, profile or app. Do not enter Google, Apple, Microsoft or banking credentials.
- Set the network to Public. Disable discovery, file sharing, automatic joins and broad AirDrop/nearby sharing.
- Connect the VPN after the portal clears. Confirm the public IP changes and DNS resolves through the expected tunnel.
- Use cellular for high-impact actions. Banking, password resets and identity verification are not worth forcing through an uncertain hotspot.
- Forget the network when leaving. This removes a saved name that a future lookalike hotspot could imitate.
Kill-switch and leak check
| Test | Expected result | If it fails |
|---|---|---|
| Connected public IP | VPN exit IP, not the hotspot-assigned public IP | Stop; reconnect with the full device app, not only a browser extension |
| DNS check | No resolver attributable to the café, hotel or local ISP | Enable the VPN DNS setting; retry with encrypted DNS only if the VPN is off |
| Wi-Fi off/on while loading a page | Traffic pauses until the tunnel reconnects | Enable the kill switch or always-on mode before continuing |
| Captive portal returns | Portal is cleared with the VPN briefly paused, then the tunnel reconnects before other apps open | Close background apps and repeat the portal-first sequence |
FTC guidance says widespread HTTPS makes ordinary public Wi-Fi usually safe in transit, while phishing and account hygiene still matter. MITRE documents malicious Wi-Fi and captive-portal interception; a VPN adds a useful encrypted route but cannot make a fake login form trustworthy.
VPN shortlist
Which VPN actually helps on public Wi-Fi?
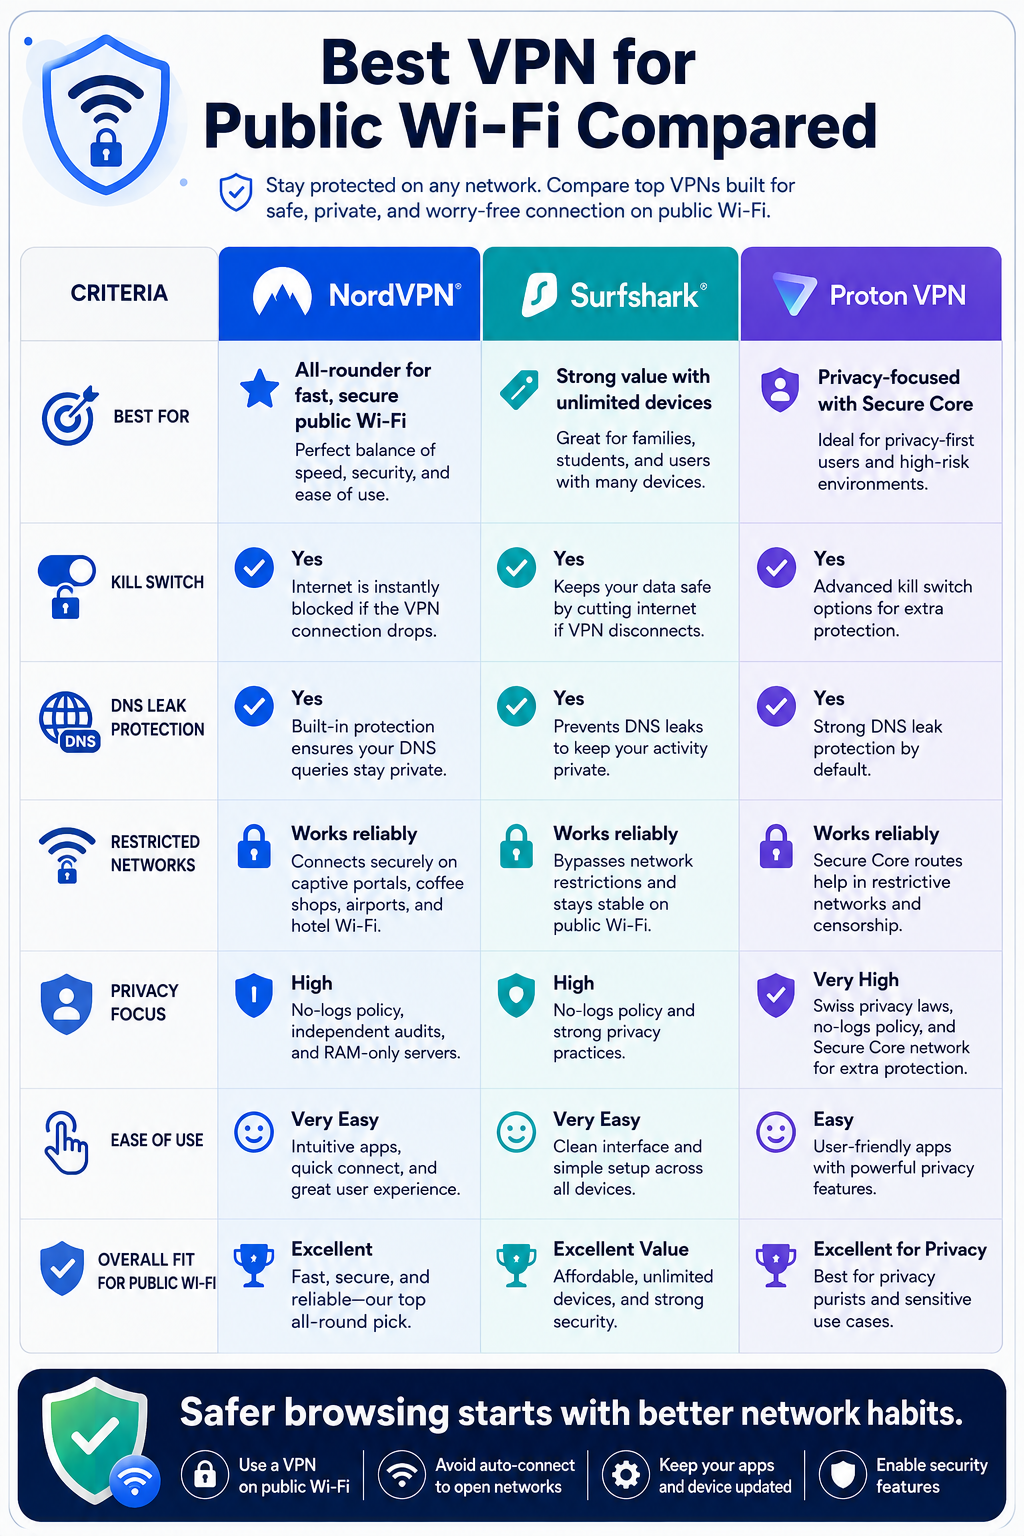
Focus on auto-connect, a dependable kill switch, DNS inside the tunnel and protection against known malicious domains—not headline server counts.
| Provider | NordVPN | Surfshark | Proton VPN |
|---|---|---|---|
| Auto-connect on untrusted Wi-Fi | Yes | Yes | Yes |
| Malicious site / phishing blocking | Threat Protection Pro | CleanWeb | NetShield |
| Reconnect handling on flaky Wi-Fi | Standard | Everlink self-healing | Standard |
| Split tunnelling | Yes | Bypasser + Reverse Bypasser | Platform-dependent |
| Devices | 10 | Unlimited | 10 (1 on Free) |
| Usable free tier | No | No | Yes — no data cap |
| Independent no-logs audits | 6 (latest Deloitte 2025) | 2 (Deloitte 2023, 2025) | 5 consecutive (Securitum) |
Best malicious-site protection
NordVPN
Threat Protection Pro is the differentiator here: it blocks known malicious and phishing domains at the connection layer, which is where fake captive-portal follow-up pages often land. Combined with auto-connect rules and a dependable kill switch, it is the strongest fit for people who work from cafés regularly.
Pros
- Strong threat-blocking layer
- Six no-logs assurance engagements
- NordWhisper for filtered networks
Cons
- Threat Protection Pro is not on every tier
- Ten-device limit
- Renewal costs more than the introductory rate
Best for unstable networks and many devices
Surfshark
Everlink restores dropped tunnels instead of fully renegotiating the connection. That makes a real difference on unreliable hotel Wi-Fi. Unlimited simultaneous connections also cover a household or shared workspace on one subscription.
Pros
- Unlimited simultaneous devices
- Everlink improves reconnect handling
- CleanWeb blocks known malicious domains and ads
Cons
- Some features vary by platform
- Smaller server network than the other two
- Introductory and renewal pricing differ
Best free and privacy-first option
Proton VPN
If you use public Wi-Fi occasionally, Proton VPN Free is a practical fallback: no data cap, no ads, no activity logs, randomly selected servers in ten countries and one simultaneous device. Paid users also get a privacy-first product with open-source apps, repeated independent no-logs audits and published transparency information.
Pros
- Usable free tier with no data cap
- Open-source apps and repeated audits
- NetShield and Stealth protocol
Cons
- Free tier is limited to one device
- Split tunnelling varies by platform
- Fewer convenience features than some rivals
If you are setting this up ahead of a trip, our best VPN for travel guide goes deeper on obfuscation and restrictive networks.
After setup
What to expect after this setup
Realistically: nothing dramatic. That’s the point.
You’ll notice a small speed cost from the VPN — usually single-digit percentage on a decent connection, more on a congested café network. You’ll notice a few sites asking for extra verification because your IP changed. You’ll occasionally have to pause the VPN for a captive portal.
What you’ve actually changed: the network operator no longer sees which sites you visit; your device no longer silently joins networks it half-recognises; and you have a habit that makes the fake-portal attack much less likely to work on you.
Make it stick
Tips for better results
- Do the setup at home, once. Configuring a VPN in an airport with fifteen minutes to boarding is how people give up and connect unprotected.
- Use cellular when it’s easy. A local eSIM is often cheap, and mobile data is encrypted between your device and the tower. For short sessions it’s simply less hassle than any of this.
- Consider a travel router for longer stays. It joins the hotel network once, runs the VPN itself, and hands out a private network to all your devices — no per-device setup, and it covers gadgets with no VPN app.
- Don’t rely on "the network has a password." A password everyone in the building knows keeps out passers-by, not the person two tables over.
- Re-check your DNS leak test after any OS update. Updates reset network settings more often than you’d expect.
Simpler options
Alternatives to using public Wi-Fi
- Phone tethering — your own encrypted link, no shared network. Costs data.
- Local eSIM — usually the cheapest option abroad, and removes the problem entirely rather than mitigating it.
- Offline-first habits — download maps, boarding passes and documents before you leave. The safest network is the one you don’t need.
Practical answers
FAQ
Is public Wi-Fi safe in 2026?
Much safer than it was a decade ago. Near-universal HTTPS means passive eavesdropping on your passwords and messages is largely solved. What remains exposed is metadata — which sites you visit — plus the real risk of connecting to a fake network with a convincing login page.
Do I really need a VPN on public Wi-Fi?
It’s useful but not essential for most people. Its genuine value is hiding your DNS queries and browsing destinations from the network operator. It will not protect you from typing credentials into a fake captive portal, and it doesn’t make you anonymous.
What is an evil twin Wi-Fi attack?
An attacker broadcasts a network with a name that mimics a legitimate hotspot, often with a stronger signal so your device prefers it. Once you connect, they can show a fake login page to harvest credentials or push malware. Verifying the exact network name with staff is the main defence.
Is public Wi-Fi with a password safe?
Safer than a fully open network, since each client gets a separate session key — but a password shared on a chalkboard doesn’t authenticate the network to you. An evil twin can use the same password. Verify the name, not just the presence of a password.
Can a VPN protect me from a fake captive portal?
No. A VPN encrypts traffic; it can’t stop you voluntarily entering credentials into a convincing form. Some VPNs block known malicious domains — NordVPN’s Threat Protection Pro, Surfshark’s CleanWeb, Proton VPN’s NetShield — which helps against known bad pages, but not novel ones. Judgement is the real control.
How we evaluated
Methodology: how we built this guide
Our methodology starts with current primary guidance from the FTC, Google Chrome Security, MITRE ATT&CK and the Wi-Fi Alliance. We mapped that threat model to controls a reader can verify on a current phone or laptop, then checked provider-specific claims against official product and audit documentation on August 30, 2026. The supplied settings screenshots and diagrams are editorial evidence, not a claim of laboratory testing.
For a travel-specific follow-up, see guide: best VPN for travel. For a broader decision framework, read How to Choose a VPN.
Finish the setup
Next steps
Do the seven steps once, at home, on every device you travel with. The whole thing takes about fifteen minutes and you won’t have to think about it again.
Compare the evidence and limitations in our detailed NordVPN review, Surfshark review and Proton VPN review. The three explicit plan buttons above are the only commercial links in this guide.